Set up a web experiment
This article helps you:
Understand the difference between a Web Experiment and a feature experiment
Build a Web Experiment using the Visual Editor
AMPLITUDE ACADEMY
Getting Started with Amplitude Web Experimentation
Learn how to use Web Experimentation to fuel conversion rates in your web experiences and single-page apps.
Learn Web ExperimentWeb Experiment lets you create an A/B or multi-armed bandit experiment without new code. Open your site in the Visual Editor, choose the elements you'd like to experiment with, and make changes to their content or properties directly. This allows for less-technical users to create experiments without engineering resources.
Web Experiments use Pages to precisely control where your experiment variants apply on your website, helping you scope experiments to specific URLs without affecting unrelated parts of your site.
Note
Before you begin
Before setting up a web experiment, you must implement the Web Experiment script on your site.
Be aware that creating and running a web experiment is different than in Feature Experiment, though there is some overlap.
Setting up a web experiment
To set up a web experiment
-
In Amplitude Experiment, navigate to Experiments > Create Experiment > Web Experiment.
-
In the New Experiment modal, name your experiment.
-
Enter the URL of a page this experiment targets and select the appropriate project from the drop-down. This URL is used to create your first Page. Web Experiment must be instrumented on this URL for the experiment to work.
If the script is present on the page you specified, Amplitude Experiment opens the page in the Visual Editor as a new variant in your experiment.
You have two options for the treatment variant action: element changes or URL redirect.
Warning
If the script isn’t present on the page you specify, or if you have an ad blocker or other privacy extension enabled, Amplitude Experiment can’t open the Visual Editor and opens the Site Setup panel and prompt you to implement the script. -
To change text, colors, or other elements of the page’s UI, click Element Changes.
-
Click the element you want to change.
-
The editing toolbar opens beside the selected element with quick actions such as editing the element’s content, or move element.
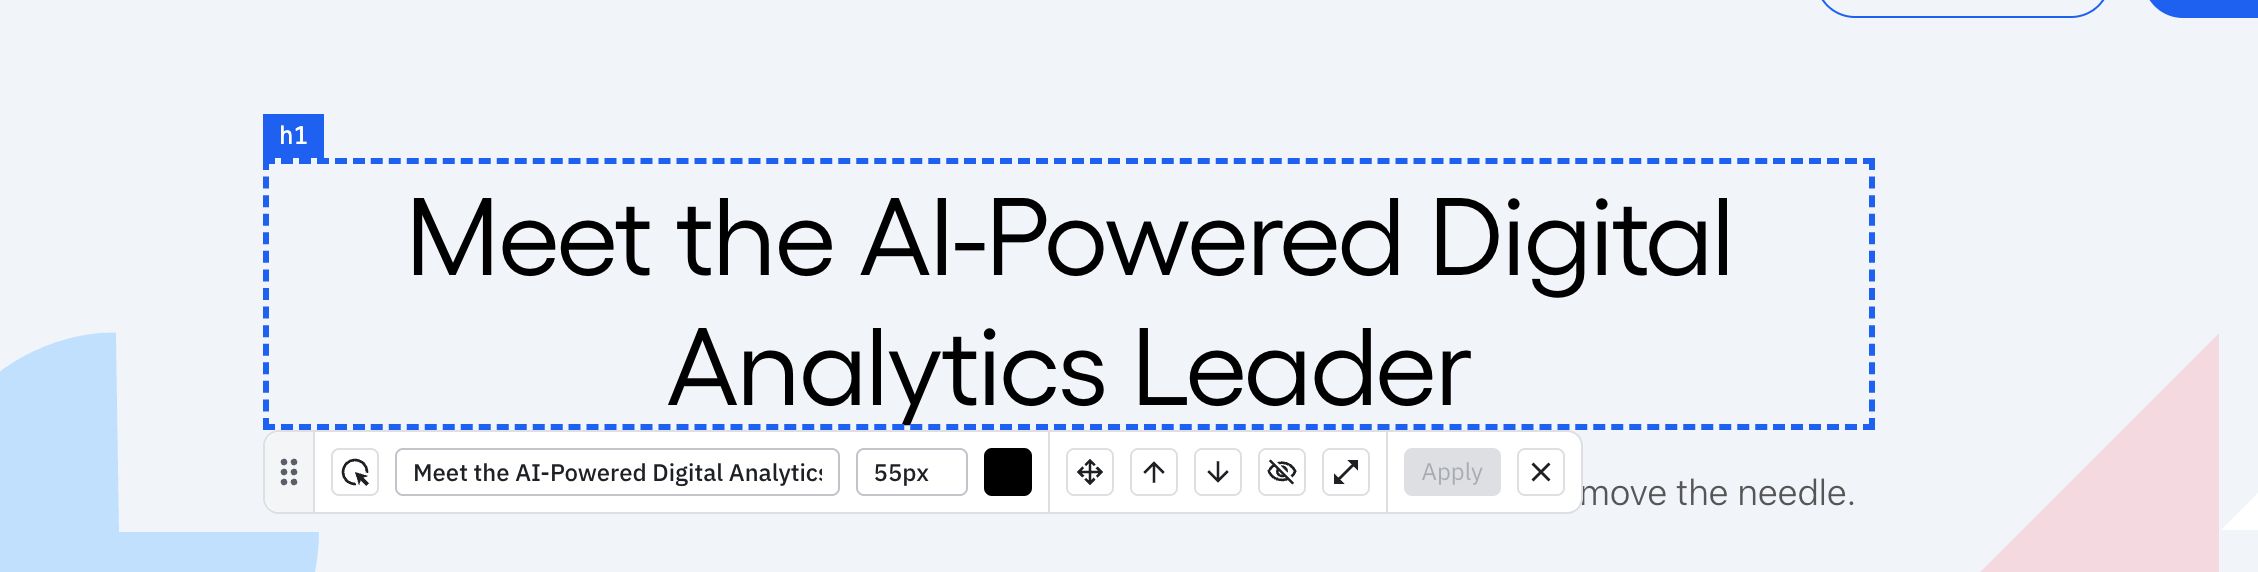
Clicking the expand icon opens the drawer allowing you to edit CSS style properties.

-
When you're done, click Apply.
-
Repeat this process for each element you want to change for your experiment.
-
(Optional), click + to add another variant.
-
When you’re done, click Continue.
After the experiment is set, you can define the experiment's goals.
To define your experiment's goals
-
In the Pages tab, configure which Pages your experiment should target. You can create new Pages or reuse existing saved Pages. If you're only targeting the page you originally set on creation, you can skip this step.
-
From the Include pages where dropdown, specify how you want Amplitude Experiment to identify these pages.
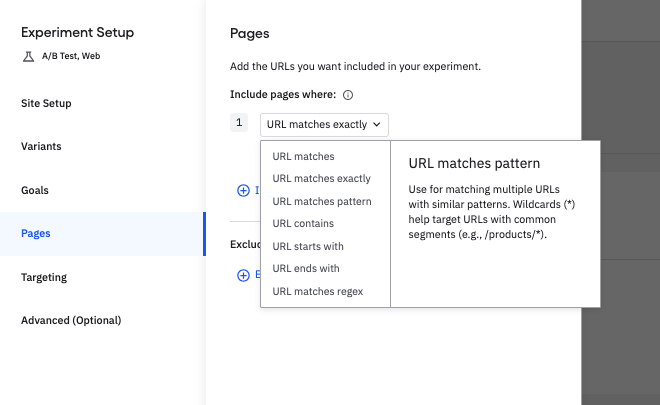
Use the same pattern to exclude experiment from the pages you select. Learn more about managing Pages for precise experiment targeting.
-
Target the users you want to include in this experiment. Go to audience targeting for more information. Note that Web Experiment audience targeting works differently than Feature Experimentation.
-
Specify any additional options in the Advanced tab.
-
Click Save and Close to finish creating your Web Experiment.
Create a new run of an existing experiment
Testing and previewing your web experiment
Before running your web experiment, Amplitude recommends that you test and preview each variant.
To test your web experiment
- Click Test & Preview. This puts your experiment in test instrumentation mode, but it doesn't begin the experiment. Only users who open the page with the preview link experience your changes.
- In the modal, click Preview to open a new tab that applies the changes you made for that variant.
- Click the chain link icon to copy the URL to share it with others.
Test each variant at least one time, testing on more than one page if your experiment targets multiple pages.
If your changes aren't visible, you may need to wait up to 60 seconds for caches to refresh. If the changes don't appear correctly after that time, check your configuration for possible issues.
Ad blockers
The Visual Editor
The Visual Editor loads the site located at the URL specified on experiment creation and loads an overlay on top of it. Every element of your site is accessible within the Visual Editor, for you to modify in whatever ways best suit your experiment’s needs.
Note
When you click on an element, the editing toolbar opens beside the selected element with quick actions such as editing the element’s content or move element. These changes are only added to the current variant after you apply them.
This toolbar consists of the following sections and tools:
- Selector
- Styles
- CSS
- HTML
- Move
- Navigation
Selector
The selector is a unique identifier for the selected element on the current page. Web Experiment disables this by default. You may need to update the selector if you're running the experiment on multiple pages as the selector that's generated is only unique for the current page. As an alternative, you can edit the selector to select and edit multiple elements.
Styles
The Styles tab contains many frequently used CSS properties. These include: font size, font color, text alignment, padding, margin, background color, display, visibility, and more.
CSS
The CSS tab lets you define any CSS property and value, which apply inline to the selected element.
HTML
The HTML tab lets you edit the HTML contents of the selected element.
Move
Move the selected element up or down in the DOM tree to adjust its placement relative to its current node. The Move option is available from the primary tool menu bar. This control updates the underlying HTML of your page. It doesn't enable moving elements by a predefined amount using CSS.
To move elements in the page
- Click the element you want to move.
- In the editor menu bar, click the Up or Down arrow buttons to move the element. The element moves through one of the HTML elements surrounding it at a time.
- Continue clicking the buttons until you move the element into the position you want.
Keep the following in mind as you move elements on the page:
- If changes don't apply, ensure you chose the correct selector for the intended element.
- Ensure that CSS styles on your page don't conflict with the updated positioning.
- Ensure that JavaScript doesn't reset your changes after you apply them.
- Moving an element ignores invisible elements in your DOM.
Navigation mode
Navigation Mode enables you to navigate between pages in your experiment without exiting the editor.
It’s particularly useful for:
- Experiments spanning multiple pages, such as multi-step forms, checkout flows, or onboarding sequences.
- Editing variants across multiple pages within the same experiment.
To enter Navigation mode
- Open your experiment and access the visual editor.
- In the primary toolbar at the top of the page, click Navigate.
- Navigate your site.
- When you click an element on the page, it responds as it would normally. It performs its intended function, rather than selecting it as part of the experiment.
- If you navigate to a page not included in your experiment and attempt to make edits, the Visual Editor automatically updates the page targeting rule to include the page URL and displays a message to let you know.
- When you land on the page you went to edit, click the pencil icon to toggle the Visual Editor back to Edit mode.
- Toggle between Edit and Navigation mode as needed to complete your experiment's configuration.
August 6th, 2025
Need help? Contact Support
Visit Amplitude.com
Have a look at the Amplitude Blog
Learn more at Amplitude Academy
© 2025 Amplitude, Inc. All rights reserved. Amplitude is a registered trademark of Amplitude, Inc.