Experiment Quick Start
This article helps you:
Setup the SDK and deployment for your experiments
Create feature flags, variants, and payloads
Design and implement the experiment
Experiment is a workflow-driven behavioral experimentation platform that accelerates the process of creating different variants of features and websites for experimentation.
With Experiment, you can modify and configure product experiences for unique audiences through:
- Product experimentation: running experiments and A/B tests to onboard new users, reduce friction for checkout experiences, roll out new features, and more.
- Progressive feature delivery: Pre-plan and stage new features for beta testers, a percentage of your users, or even specific target audiences.
- Dynamic in-product experiences: Deploy and adapt custom experiences at scale.
- Web experimentation: Perform A/B testing directly on your website.
Experiment enables experimentation through either Feature Experiment or Web Experiment:
- Feature Experiment enables experimentation through feature flags. Feature flags are switches that let you modify your product's experience without having to change code.
- Web Experiment enables experimentation through the Visual Editor. The Visual Editor places a dynamic, customizable layer over your existing website. Through the Visual Editor, you can customize any element of your website without having to make changes directly to the site's underlying code or structure.
For more information about the use cases for each type of experimentation, go to Feature and Web Experiment Use Cases.
This page is divided into quick start information for Feature and for Web Experiment. Click the tab for the experiment type you want to set up.
Warning
Experiments and feature flags use the Amplitude Experiment SDK or REST API to communicate with Amplitude Experiment.
Setting up an experiment is a multi-stage process encompassing the following procedures:
- Installing and setting up SDKs and deployments
- Creating feature flags
- Selecting the deployment and creating a payload
- Creating variations and sending payloads
- Designing experiments
Prerequisites
Before you can begin using experiments:
- Confirm you have developer write access to the Experiment SDK.
- Make sure you have access to the Experiment feature.
- Ensure you have developer access to the application where you'll integrate your feature flags.
Setting up the SDK
Install the Amplitude SDK with the Experiment client. For example:
npm install @amplitude/analytics-browser @amplitude/experiment-browser
import * as amplitude from '@amplitude/analytics-browser';
import { Experiment } from '@amplitude/experiment-browser';
amplitude.init('AMPLITUDE_API_KEY');
const experiment = Experiment.initialize('DEPLOYMENT_API_KEY');
await experiment.start();
Setting up a deployment
Experiment uses the same projects as Amplitude Analytics. As a best practice, create one project for each product and each environment. Because flags, experiments, and deployments only exist within a single project, you must duplicate these objects across projects within the same product.
In Amplitude Experiment, a deployment serves a group of flags or experiments for use in an application. Each project has a deployment using the project API key as the deployment key, available by default. On creation, a randomly generated deployment key is assigned to each deployment, which Experiment uses to identify the deployment and authorize requests to the evaluation servers.
Client vs. server deployments
Deployments belong to Amplitude Analytics projects, and a project can have multiple deployments. Amplitude recommends that you name deployments after the platform (client-side) or service (server-side) to which Experiment serves variants (for example: android, ios, web). The default project API key deployment is useful for getting started. Try to use explicit deployments for each platform or service for larger organizations or teams that may share the same Amplitude project across multiple platforms for the same application. Each deployment receives a unique key for use in your application.
To create a deployment
- Go to Experiments > Deployments.
- Click Create Deployment.
- Select the project you want from the dropdown list.
- Name your deployment.
- Select whether your deployment is for Client or Server.
- Click Create a Deployment. For full details go to Configure your experiment
Creating a new flag
A flag is a way for you to enable or disable a function or feature in your product, without having to deploy new code each time. Flags drive both experiments and feature rollouts. They're ideal for launching experiments and ending them after you’ve collected enough data or for rolling out new features (and rolling them back, if needed).
To create a new feature flag
-
Go to Experiment > Feature Flags.
-
Click Create Feature Flag.
-
In the Create Flag section, select the project you want from the dropdown list and then give your flag a name. Amplitude Experiment generates the flag key from the name you choose. The flag key is an identifier for the flag used in your codebase.
-
Specify the evaluation mode for your experiment. Select either Remote or Local.
-
Specify the bucketing unit you want to use for this experiment.
Tip
The best bucketing unit is typically the user. However, in some B2B use cases, you might want to use company ID or city as the bucketing unit. For example, bucketing by company ID ensures that all users in a particular company have the same user experience. Be sure the Stable Unit Treatment Value Assumption holds for whichever unit you choose. -
Click Create. Experiment opens a blank template for your flag.
-
Choose the deployment you want from the Deployment dropdown menu.
-
(Optional) Click Advanced Settings to modify the bucketing salt options.
Note
If you change the bucketing salt, users can switch between variants in your experiment. For that reason, Amplitude recommends not to change the bucketing salt unless you know what you're doing. For more information, go to How randomization works in Amplitude Experiment.
Creating variations
A variant exists within a flag or an experiment, and represents a variable experience for a user. Variants comprise the actual A/B changes that you want to experiment with. All feature flags must contain at least one variant. You can add as many variants as you want to a flag.
To add a variant
- Go to your Experiment > Feature Flags and select your flag.
- In the Variants section, click the Plus icon to create a variant.
- Enter the name, value, and description of your variant.
- Click Apply.
Note
Add JSON content to the Payload field when creating a variant. Payload content is similar to:
{
  "layout": "cards",
  "titlePosition": "above",
  "gradient": false,
  "showDescription": true,
  "cardCount": 3
}
Add Targeting to the flag
In the Assignment section, define the user segments that you want to experience your new feature. Defining a user segment limits your rollout to users in specific geographical locations, certain demographic groups, or who meet certain usage thresholds in your product (for example power users). For more information on segmenting, go to Define your Audience.
To add targeting
- Specify the percentage of users receiving the variant.
- To define a user segment, go to the Rule Based User Segments section and click Segment 1. Then follow the same steps you’d use to build a user segment in Amplitude Analytics.
Finalizing the flag
After you set up the flag, associate it to a deployment, set up your variants or payloads, and target your users, finalize the feature flag. Finalizing the flag activates it and makes it available.
To finalize a feature flag
- Go to your feature flag.
- Click Activate flag.
Designing the experiment
You can directly create an experiment or convert an existing flag to an experiment.
Remember when designing your experiment:
- Set a goal for the experiment
- Set up any further variations and payloads
Adding goals (or metrics) lets you track the success rate of your experiment. All experiments should have at least one goal. Tell Amplitude Experiment what you want your recommendation metric to be, as well as define any secondary metrics. The recommendation metric determines whether your hypothesis is accepted or rejected, and therefore, whether your experiment has succeeded or failed.
To add a goal
- Open your experiment and navigate to the Goals section.
- Select your recommended metric from the Metric dropdown or create a custom metric.
- Select the metric type:
- A Success metric states the goal changes by the goal amount and direction.
- A Guardrail metric states the goal won't change by the goal amount and direction.
- Specify whether you’re expecting the metric to increase or decrease.
- (Optional) Set the minimally acceptable goal for the experiment, otherwise known as the minimum detectable effect. This is the minimum amount of difference between the control and the variant for the experiment to be considered a positive result.
- To add secondary metrics, click Add Metric and repeat this process for each additional metric you want to include.
To add additional variations and payloads
Repeat the steps above in your flag to create additional variations and payloads.
Starting your experiment
After you have completed designing your experiment, click Start Experiment to begin.
Code examples
The following code examples describe the code for a feature flag and a JSON payload:
import { useState, useEffect } from 'react';
import { getBlogLayoutFlag } from '../services/featureFlags'; // Adjust to wherever you fetch your Amplitude flag
import type { BlogPost } from '../types';

type LayoutFlag = {
  layout: 'cards' | 'list' | 'carousel';
  titlePosition: 'above' | 'below' | 'center';
  gradient: boolean;
  showDescription: boolean;
  cardCount: number;
};

export default function BlogPostLayoutClient({ posts }: { posts: BlogPost[] }) {
  const [layoutFlag, setLayoutFlag] = useState<LayoutFlag | null>(null);

  useEffect(() => {
    getBlogLayoutFlag().then((flag) => {
      console.log(':magic_wand: Received Flag from Amplitude:', flag);
      if (flag) {
        setLayoutFlag(flag);
      } else {
        console.log(':warning: No flag returned, falling back to default layout');
        setLayoutFlag({
          layout: 'cards',
          titlePosition: 'above',
          gradient: false,
          showDescription: true,
          cardCount: 3,
        });
      }
    });
  }, []);

  if (!layoutFlag) {
    // You might render a loader here
    return null;
  }

  // Render your posts according to layoutFlag...
  return (
    <div>
      {/* e.g. layoutFlag.layout === 'cards' ? <CardGrid posts={posts} /> : ... */}
    </div>
  );
}
// services/featureFlags.ts
import { experiment } from '@amplitude/experiment-js';  // adjust import to your SDK
import type { LayoutFlag } from '../types';              // reuse the same LayoutFlag type

export const getBlogLayoutFlag = async (): Promise<LayoutFlag> => {
  try {
    // In dev, clear any stale flags
    if (process.env.NODE_ENV === 'development') {
      localStorage.clear();
      console.warn('Cleared localStorage in dev mode');
    }

    // Initialize the experiment SDK
    await experiment.start();

    // Grab the variant for our blog layout test
    const variant = experiment.variant('blog_post_layout');
    console.log(':movie_camera: Full Variant Object:', variant);

    // Some payloads come in `payload`, some in `value`
    const value = variant?.payload ?? variant?.value;
    console.log('Cleaned Flag Payload:', value);

    // If there's no usable object, fall back to defaults
    if (!value || typeof value !== 'object' || Object.keys(value).length === 0) {
      console.warn('No valid layout flag found, using fallback layout');
      return {
        layout: 'carousel',
        titlePosition: 'above',
        gradient: false,
        showDescription: true,
        cardCount: 3,
      };
    }

    // Otherwise assume it's Amplitude's LayoutFlag shape
    return value as LayoutFlag;

  } catch (error) {
    console.error('Error fetching blog layout flag:', error);

    // On error, also fall back
    return {
      layout: 'carousel',
      titlePosition: 'above',
      gradient: false,
      showDescription: true,
      cardCount: 3,
    };
  }
};
Web Experiment requires that you implement the Web Experiment script on your site before you begin.
Paste the script into the <head> element of your site, as high as possible to avoid flickering.
The script tracks impression events with the Browser SDK already installed on your site, or a third-party analytics SDK.
Add the experiment script
Replace API_KEY with your project's API key in one of the synchronous scripts below, depending on your region:
<script src="https://cdn.amplitude.com/script/API_KEY.experiment.js"></script>
<script src="https://cdn.eu.amplitude.com/script/API_KEY.experiment.js"></script>
Security headers
script-src content policy directive, add *.amplitude.com and unsafe-inline to the policy values. These changes enable loading the Web Experiment script and visual editor on your site.
Content-Security-Policy: script-src *.amplitude.com unsafe-inline;
Cross-Origin-Opener-Policy header, you can either remove it or set it to unsafe-none. This allows the visual editor to load on your site.
Cross-Origin-Opener-Policy: unsafe-none
Set up a web experiment
To set up a web experiment, follow these steps:
-
In Amplitude Experiment, navigate to Experiments > Create Experiment > Web Experiment.
-
In the New Experiment modal, give your experiment a name. Enter the URL of a page this experiment targets. Amplitude must be instrumented on that page—and select the appropriate project from the drop-down. This URL will be used to create your first Page.
-
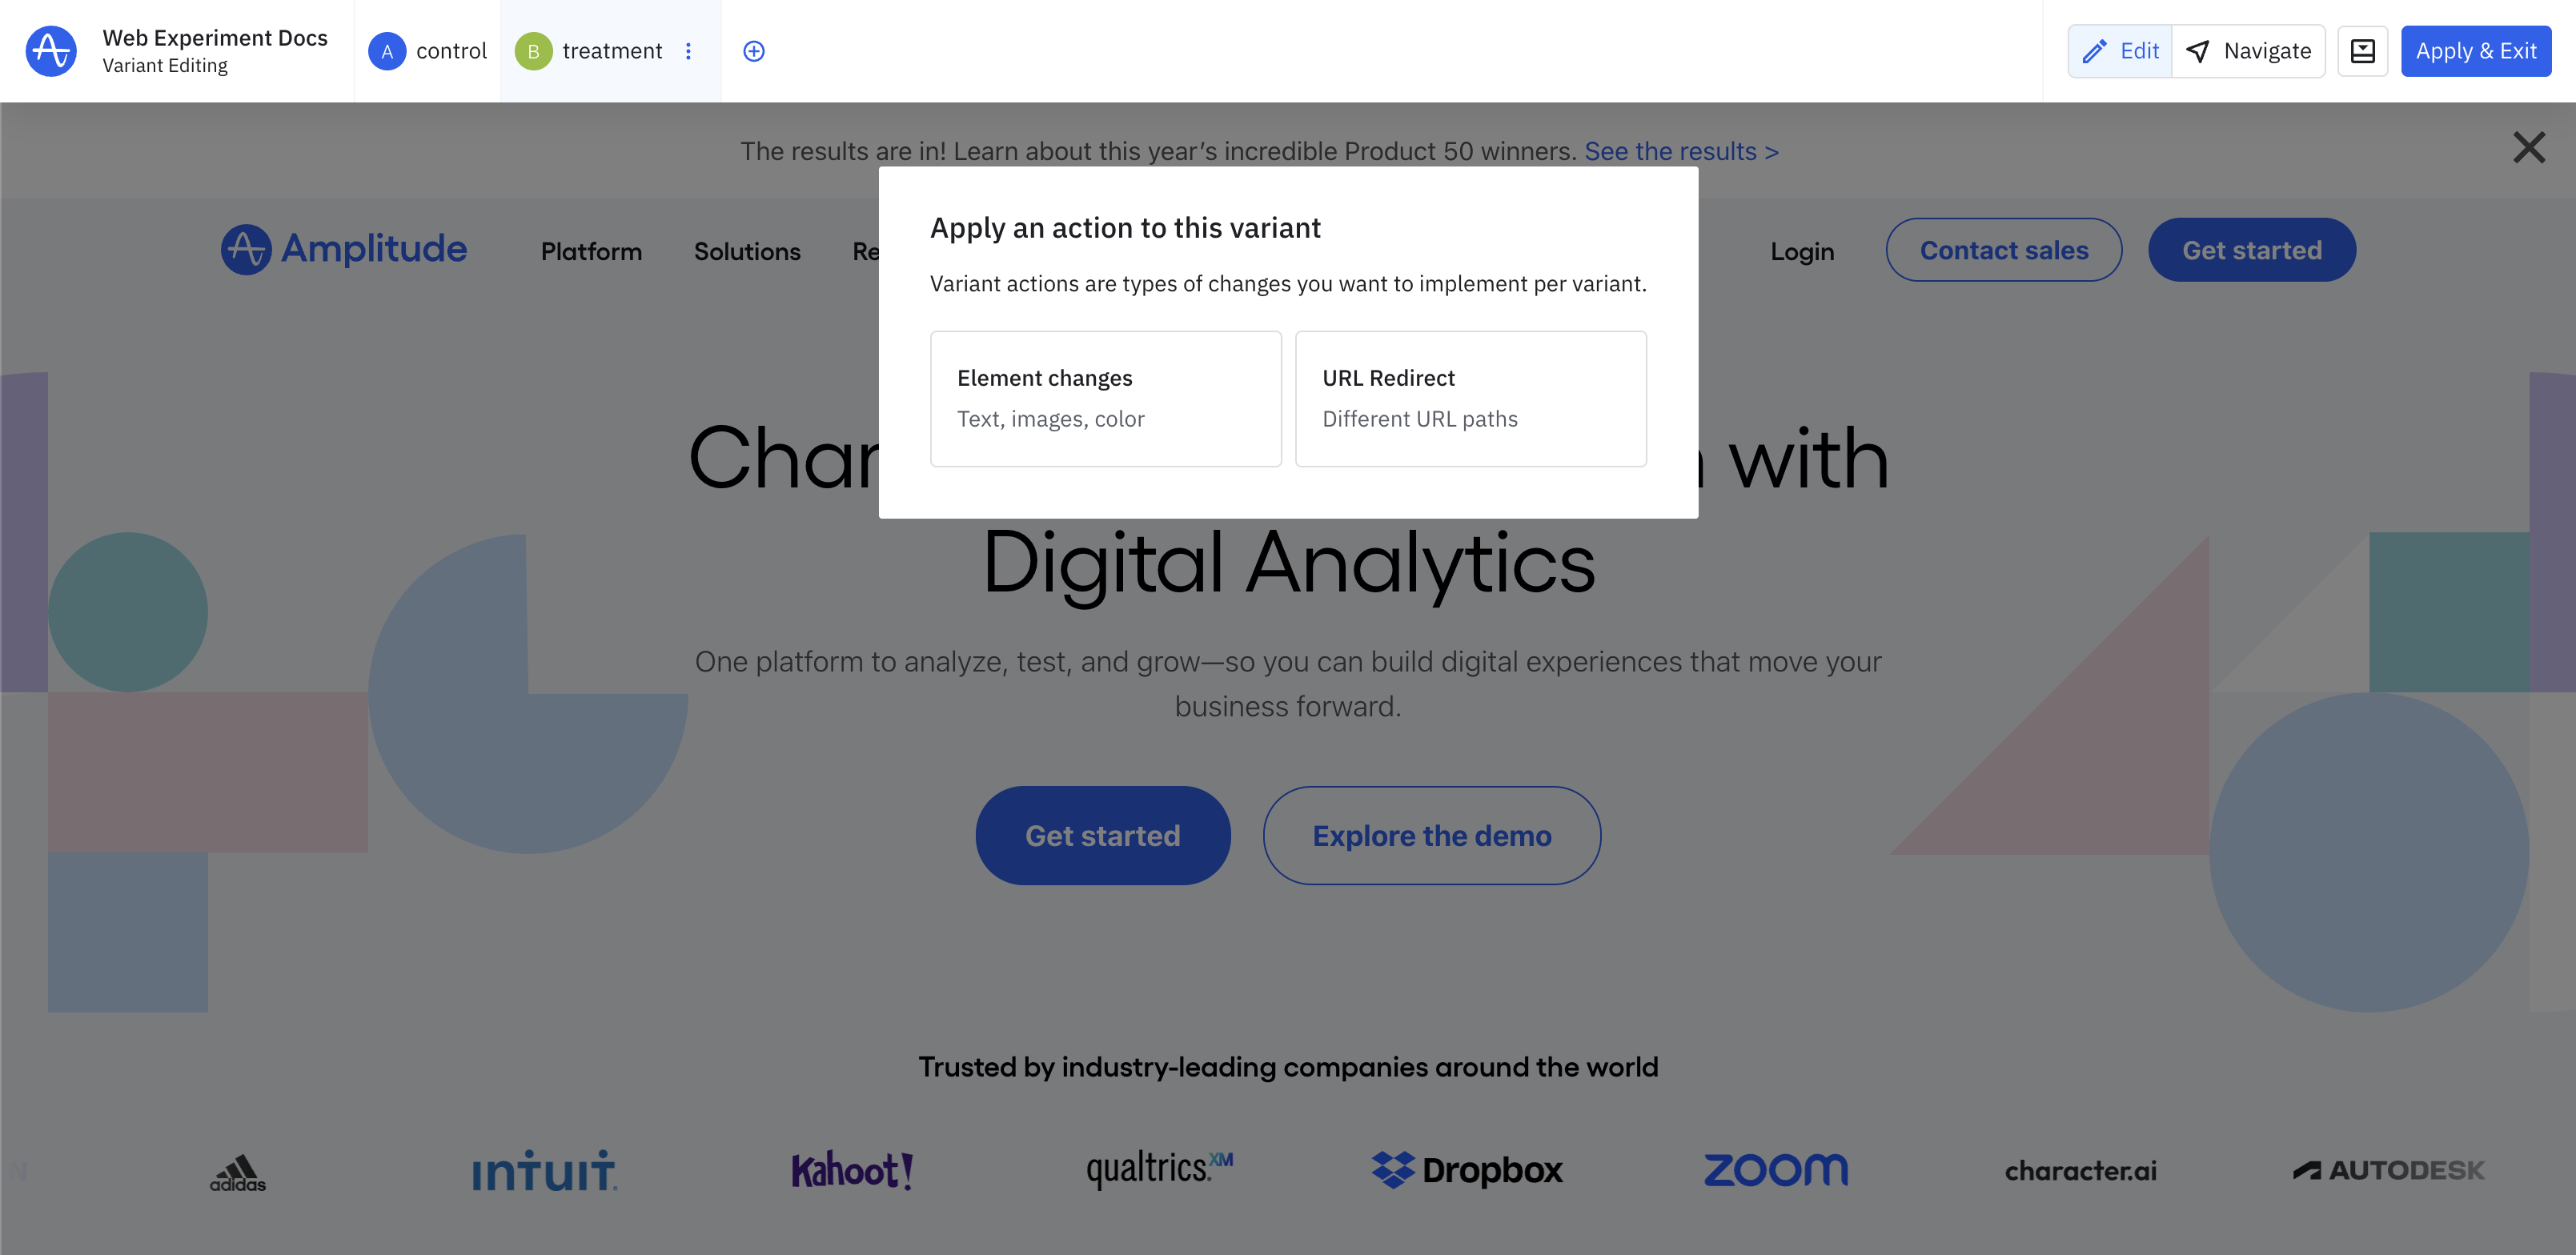
If the script is present on the page you specified, Amplitude Experiment opens the page in the Visual Editor, as a new variant in your experiment.
You have two options for the treatment variant action: element changes or URL redirect.
Warning
If the script isn’t present on the page you specify, or if you have an ad blocker or other privacy extension enabled, Amplitude Experiment can’t open the Visual Editor, and opens the Site Setup panel and prompt you to implement the script. -
To change text, colors, or other elements of the page’s UI, click Element Changes.
-
Click the element you want to change.
-
The editing toolbar opens beside the selected element with quick actions such as editing the element’s content, or move element.
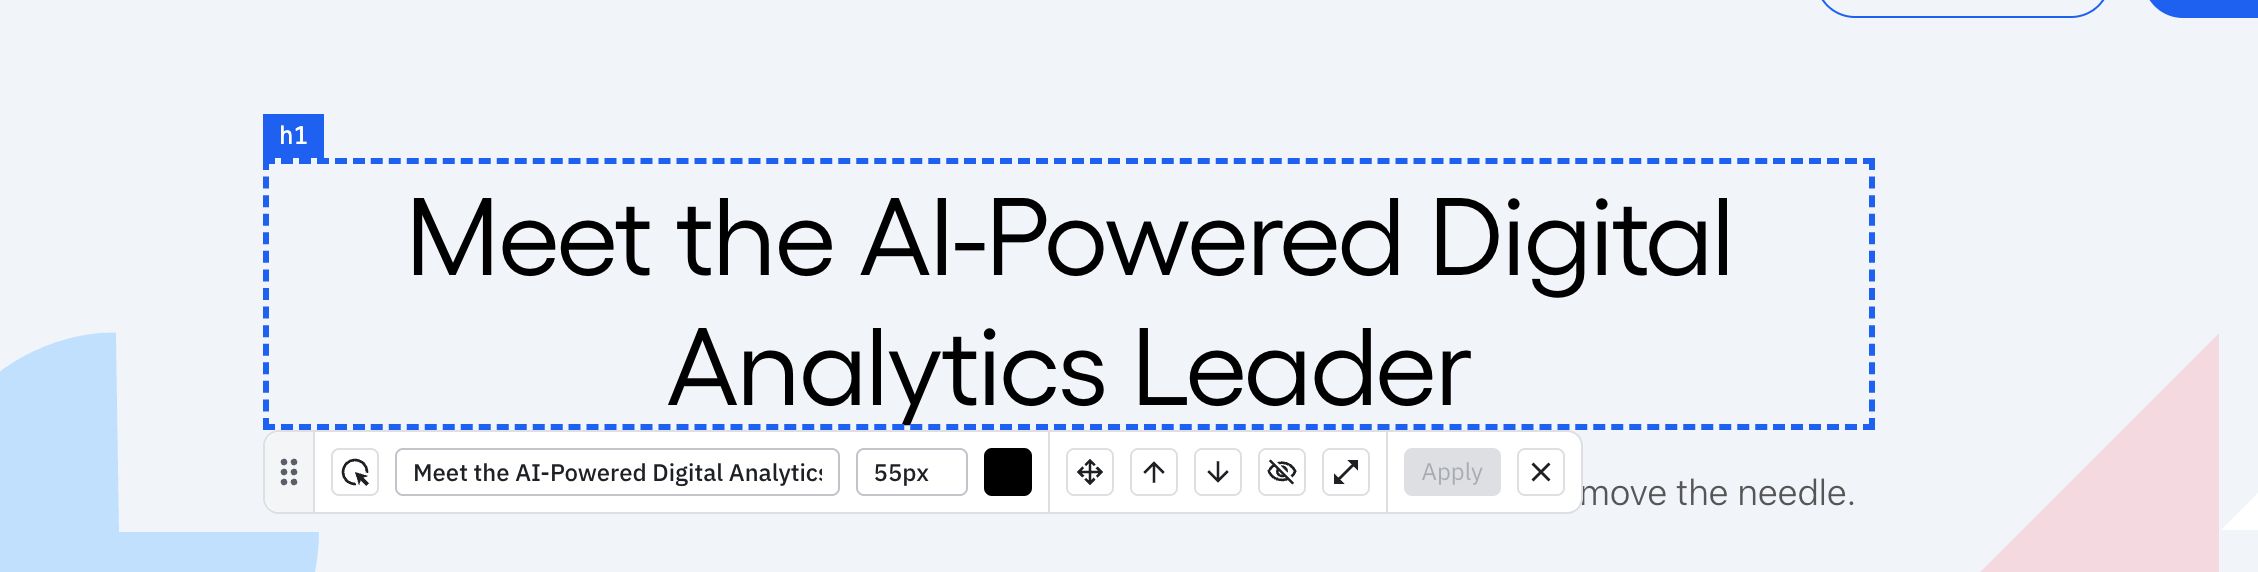
Clicking the expand icon opens the drawer allowing you to edit CSS style properties. When you're done, click Apply.

-
Repeat this process for each element you want to change for your experiment.
-
If needed, click + to add another variant.
-
When you’re done, click Continue.
-
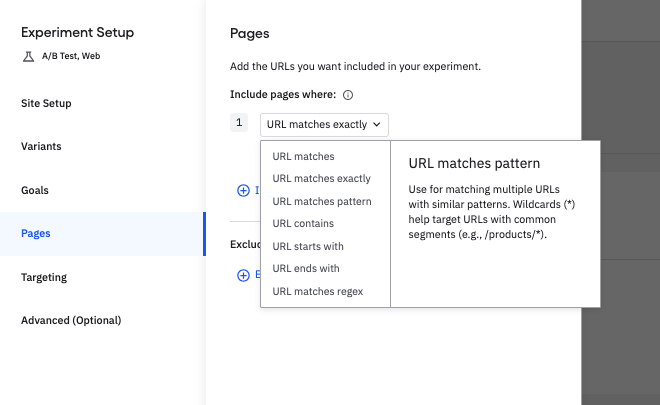
In the Pages tab, configure which Pages your experiment should target. You can create new Pages or reuse existing saved Pages. If you're only targeting the page you originally set on creation, you can skip this step. From the Include pages where dropdown, specify how you want Amplitude Experiment to identify these pages.
Use the same pattern to exclude experiment from the pages you select. Learn more about managing Pages for precise experiment targeting.
-
Next, target the users you want to include in this experiment. If you're familiar with feature experiment targeting, Web Experiment audience targeting works differently.
-
The Advanced tab provides several additional options for your experiment.
-
When you’re ready, click Save and Close to finish creating your Web Experiment.
Create a new run of an existing experiment
Test and preview your web experiment
Before running your web experiment, Amplitude recommends that you test and preview each variant. When you're ready:
- Click Test & Preview. This puts your experiment in test instrumentation mode, but it doesn't start your experiment. Only users who open the page with the preview link can view your changes.
- In the modal, click Preview to open a new tab that applies the changes you made for that variant. Click the chain link icon to copy the URL so you can share it with others.
Test each variant at least one time, preferably more. Test each variant on more than one page if your experiment targets multiple pages.
If your changes aren't apparent, you may need to wait up to 60 seconds for caches to refresh. If the changes don't appear correctly after that time, there might be something wrong with the configuration.
Ad blockers
Adding Actions
Actions define how variants modify your site. Actions relate to variants rather than a specific page, and are applied to specific Pages to control exactly where they apply.
Experiment applies variant actions during evaluation. This happens on the initial page load and any time state pushes to or pops from the session history. History state changes also cause the SDK to revert all applied element change and custom code actions before reevaluating and reapplying actions with the update page in mind.
Actions include:
Click through the above links for more information about each action.
Action examples
Tip
Insert an element
To insert an element onto your page, follow this simple pattern.
-
Write the HTML and CSS for the element you want to add to the page.
-
Identify the selector of the part element you want to insert your new element into. This is often just the
body. -
Paste the following JavaScript code, and update
PARENT_SELECTORwith the parent element selector from step 2.utils.waitForElement("PARENT_SELECTOR") .then(function (e) { e.appendChild(html); utils.remove = function () { html.remove(); } });
If you want to insert your element into the parent element at a specific position, use insertBefore() instead of appendChild().
Add a banner
This example adds a discount code banner to the top of the page.
utils.waitForElement("body")
  .then(function (e) {
    e.insertBefore(html, e.firstChild);
    utils.remove = function () {
      html.remove();
    }
  });
.announcement-banner {
 background-color: #fafafa;
 color: #333;
 padding: 10px;
 text-align: center;
 font-family: Arial, sans-serif;
 border-bottom: solid #e5e5e5;
 border-bottom-width: 1px;
}

.announcement-banner p {
 margin: 0;
 font-size: 16px;
}
<div class="announcement-banner">
 <p>🎉 Big Sale: Get 25% off on all items! Use code <strong>SAVE25</strong></p>
</div>
Working with pages
In a Web Experiment, Pages control where your experiment variants apply on your site. They help scope experiments to specific URLs, enabling you to run tests on targeted pages, without impacting unrelated parts of your site.
A Page defines the conditions under which a web experiment applies to your site, and includes:
- A unique name
- URL targeting conditions
- A Visual Editor URL to help preview the experiment
Create a page
When you create a new Web Experiment, specify a page by:
- Manual URL input: Enter a specific URL to define the page.
- Import a saved page: Select a page from a previous experiment.
After you add the page, continue with experiment setup, or go directly to the Visual Editor.
Update a page or create another
To update a page definition, navigate to the Pages tab of the Experiment Setup flow, or click the pencil icon on the Pages section of the Settings tab. From there, rename the page, update its Visual Editor URL, or update the page targeting rules.
Page targeting rules
| Operator | Description | Examples |
|---|---|---|
| URL Matches | Match the page URL, ignore query parameters or hash fragments. | https://example.com/pricing ✅ https://example.com/pricing#details ❌https://example.com/pricing/enterprise |
| URL Matches Exactly | Match the full page URL exactly. | https://example.com/pricing?utm_source=facebook ❌https://example.com/pricing ❌ https://example.com/pricing?utm_source=tiktok |
| URL Matches Pattern | Match the full page URL, including wildcards (*). |
https://example.com/blog/* ✅ https://example.com/blog/my-first-post ✅ https://example.com/blog/my-second-post#get-started |
| URL Contains | Match the full page URL, where the URL contains a specific substring. | /blog/my-first ✅ https://example.com/blog/my-first-post ❌ https://example.com/blog/my-second-post |
| URL Starts With | Match the full page URL, where the URL starts with an exact substring. | https://example.com/blog ✅ https://example.com/blog/my-first-post ❌ https://example.com/pricing |
| URL Ends WIth | Match the full page URL, where the URL ends with an exact substring. | /blog/my-first-post ✅ https://example.com/blog/my-first-post ❌ https://example.com/blog/my-first-post#get-started |
| URL Matches Regex | Match the full page URL with a regular expression you define. | Learn Regex Test Regex |
Manage page scope for variants
In a web experiment, you can scope each variant to a specific page to ensure that the variants changes apply only where you intend. This is the case for all variant types.
Visual editor
When you use the Visual Editor to make changes, for example text edits or style updates, those changes associate with the page you select during the preview session. For each change, specify the page or pages it applies to.
This enables you to:
- Assign updates or changes to a specific page
- Avoid applying the same change across all views
- Maintain better isolation and clarity across your experiment setup
Double-check the page scope
Custom code
When you add custom code or URL redirects as variants, you can explicitly define which page or pages the variant applies to.
This enables you to create a single experiment that includes custom code with different behaviors, depending on the active page.
Targeting
Web Experiments target both pages and audiences. Amplitude evaluates first page targeting and then audience targeting. Both targeting methods evaluate locally in the browser when the page first loads.
Web Experiments use Pages to precisely control where experiment variants apply on your website. Pages define the conditions under which a web experiment should apply, including targeting conditions to match specific URLs and visual editor URLs for previewing experiments.
Audience targeting
By default, a new Web Experiment targets all users. Audience targeting enables you to target specific users for your experiment. Users who aren't targeted in the experiment receive the default experience and don't count towards analysis.
If any segments match, Amplitude buckets that user into a variant based on the configured rollout and variant distribution. For a segment to match, it must meet all conditions you set. Go to Web Experiment targeting for more details.
Web Experiment performance
Web Experiment intentionally minimizes its impact on page performance.
Note
Script size
The Web Experiment script is dynamic, and includes all your experiment configurations to avoid making multiple synchronous downloads. This means that the script size starts with a base size, and scales with each experiment.
| Uncompressed | Compressed | |
|---|---|---|
| Base script | 79KB | 20KB |
| Per-flag size | ~1KB | ~100B |
To avoid constantly increasing script sizes, deactivate or archive experiments when they're complete.
Custom code impact on flag size
Caching
Web Experiment uses two layers of caching: CDN and Browser. This helps to provide more reliable script delivery to your site.
CDN cache
Amplitude caches the Web Experiment script on a CDN. When a user requests the script, their browser loads it from the CDN if another user loaded it in the same geographic area. The CDN cache has a max age of one minute, and serves stale content while the script reloads for up to one hour. The script serves a stale response if the origin returns an error for the maximum amount of time possible.
The cache control response header that configures CDN caching is:
max-age=60,stale-while-revalidate=3600,stale-if-error=31536000
Browser cache
The browser cache serves the Web Experiment script without making a network request for 60 seconds, or the maximum amount of time if the server returns an error. This caching layer serves the script from memory (0ms latency) if a user loads multiple pages on your site, or reloads the same page within a one minute window.
The cache control response header that configures browser caching is:
max-age=60,stale-while-revalidate=3600
July 21st, 2025
Need help? Contact Support
Visit Amplitude.com
Have a look at the Amplitude Blog
Learn more at Amplitude Academy
© 2025 Amplitude, Inc. All rights reserved. Amplitude is a registered trademark of Amplitude, Inc.